Monday 29 July 2013

How To Root LG Optimus L9

Hello good people.Today i am going to guide you on "How To Root LG Optimus L9".as we know LG Optimus L series is going really well.this LG optimus L9 with good camera and processor.so before starting the root process we have some requirements.

Requirements.


1. Backup all your important data.

2. We need to Enable USB Debugging.Go to Settings > Manage Application > Development >USB Debugging.Click the check box.

3. Maintain battery charge more than 60% .

4. We need to have BootLoader to be Unlocked.

5. Download USB drivers for LG Optimus L9 .

6. Download root files Root Package and RunMe.txt

7. We need to have Bootloader unlocked.if not,Unlock it here.
Procedure.

Step 1. After you have downloaded Root package and Runme.txt copy it to your computer.and extract "Root Package"

Step 2. Now rename "RunMe.txt" to "RunMe.bat" and paste it on the extracted folder.

Step 3. Now inside this folder Open "RunMe.bat" and click 1 to select "Normal Mode"

Step 4. Now when you Open it you will get a prompt.now click "Restore my data" this will send the superuser to your device.

Step 5.Now your phone is successfully rooted.to use the superuser we first need to download SuperUser and Busybox from playstore for free.

Now you have successfully rooted your phone.

How To Add Facebook Like Box On Your Blogger website.

Hello good people.Today i am going to show you how to "Add Facebook Like Box On Your Blogger website". So now with your Facebook fan page you are going to connect it to your blogger website.this will bring more traffic to your website from facebook fan page.and will increase the fan page likes very fast.before you are going to start the process you need to have a facebook fan page and blogger website.so now lets start the procedure.

Procedure.

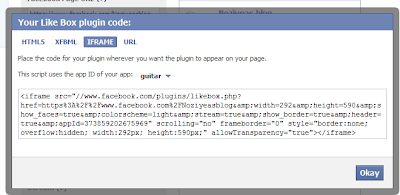
Step 1. Open facebook Like box generator page from here.make sure you are logged in to facebook currently.

Step 2. Now we Need to change the Facebook page URL to the URL of your facebook fan page.
Note-You can uncheck the "Show stream" if you dont want like box to show news feed.

Step 3. Now click "Get Code" and copy the "iframe" code .
Step 4. Now go to your blogger dashboard > layout then click "add a gadget".then scroll down and select "HTML/Java script" click on the blue Plus button.
Step 5. Now a Small window will open with "Title" and "Content" put the cane of your website in "Title" and paste the Code in the "Content" and save it.
Step 6. After you have saved the HTML/JavaScript you are done with it.now save the arrangement and look for facebook like box in your blogger website.


How To Root HTC Desire X And Install CWM recovery

Hello good people.Today i am going to guide you on How To Root HTC Desire X and Install CWM                  Recovery.this is the simplest way to root HTC Desire X. And using Clockworkmod Recovery you can flash  custom rom on your device giving you full control over your phone.rooting can also used to flash custom recovery.img to overclock the processor.  so before rooting and installing we need some requirement.make a complete backup of your important data.

Requirements.

1. Backup all your important data.

2. We need to Enable USB Debugging.Go to Settings > Manage Application > Development >USB Debugging.Click the check box.

3. Maintain battery charge more than 60% .

4. We need to have BootLoader to be Unlocked. Use this guide to do that.

5.  Download HTC Desire X drivers and Install it.

6.  Download root files. cwm for jelly bean. Superuser-3.1.3-arm-signed.zip and Root kit.

7.You need to have a computer to root.

Procedure.

Step 1. Once you have downloaded all the requirement files.Extract the "root kit" on your computer.

Step 2. Devices which are updated to jellybean follow "Step 3"

Step 3. Now place the "cwm" file that you have downloaded to Recoveries folder inside Desire x all in one kit folder.and rename the file to "recovery.img"

Step 4. Now go to extracted folder and open "Desire.exe"

Step 5. Now you will find a option "Next Flash a Recovery" choose this.

Step 6. Now jelly bean devices select "your own recovery" and click "Flash recovery" button. for Iceam sandwich devices select the other option and click "Flash recovery" button.

Step 7. Now we have installed cwm on to your device.lets Root the device.so now copy the superuser.zip that you have downloaded on to your SD card.

Step 8. Reboot the device and press "Volume Down + Power" Button together for few seconds.after that select "Recovery"

Step 9. Now from clockworkmod (cwm) recovery you have to install superuser.zip.to do that select "Install ZIP from SD card" and find the superuser.zip file that you have downloaded.then click Yes.

Step 10. Now wait for few minutes and installation of superuser will be completer.now reboot your device and you can see super user app available.

How To Root Micromax Canvas HD A116

Hello Good People.today i am going to show you How To Root Micromax A116 Canvas HD.
now we are going to start the rooting process.so before that we need  to do some Pre-requisite.

Pre-requisite.

1.Make sure you have done a full backup of your data.

2. We need to enable USB debugging.go to Settings > Manage Applications > Development > USB Debugging.click check box.

3. Make sure you have Clockworkmod Recovery installed in your device.

4. Maintain battery charge more than 60%.

5. Install USB drivers for your device.

Procedure.

Step 1. We need to download superuser package and superuser bin and place it SD card.

Step 2. Now we need to go to Recovery mode.Reboot your phone by pressing "Volume Up + Power button."Note-You can navigate in cwm recovery by pressing volume button and select be Power button.

Step 3.Now  first we have to "wipe data and factory reset".select this option and click yes.then "wipe cache" then inside Advance "wipe dalvik cache" wipe all the 3 mentioned above.

Step 4. Now we are going to flash the Superuser files to the device.Now go to main menu in Clockworkmod recovery and select "Install ZIP from SD card".then find the file "Superuser-3.1.3-arm-signed.zip" from the sd card and install it.now after that again select "su-bin-3.1.1-arm-signed.zip" and install it.
Step 5. Now reboot your device normally.now you have successfully rooted your phone.you can see superuser app available.

Tuesday 23 July 2013

How to root Sony Xperia L


How to root Sony Xperia L

Hello good people.today i am going to show you how to root Sony Xperia L.really a good phone with 1.0GHz snapdragon processor.it has 1GB of RAM makes it powerful.so now lets begin with the rooting.

Pre-requisties and requirement.

1. Enable USB debugging mode,in settings>development Options, check Development Options then check USB Debugging down there.

2. You need Sony xperia L USB driver for windows.

3. Make sure you have 70% battery charged.

4. Make a complete backup of your phone.

5. Sony xperia L - Unlock Bootloader


File needed.
1. Extracted stock kernel. download

Procedure.

Step 1: Unlock Sony Xperia L bootloader.

Step 2: Set fastbook in your computer if your dont have it.

Step 3: Once you have done with setting up.make a newfolder name it as fastboot.now fastboot.exe from android-sdk/tools to newfolder.and also copy adb.exe and adbwinapi.dll from android-sdk/platform-tools to new folder.

Step 4: Once you have the Extended stock kernel.zip file downloaded.extract it to another folder.now copy the boot.img from that folder to the fastboot folder that you just created.

Step 5: Now we have to get into fastboot Mode.to do this Hold Volume Up button while connecting the USB cable.

Step 6: Now in your computer go to command prompt.u can find it by typing command prompt in "run".

Step 7: Now to naviagte to the fastboot folder type "C:\fastboot" after you have entered it then type "fastboot flash boot boot.img" this will flash boot.img file to your phone.

Step 8: Now reboot your phone and check the rooting is successfully done.

Saturday 20 July 2013

How To Root Samsung Galaxy S duos S7562

How To Root Samsung Galaxy S duos S7562.

Hello good people.today i am going to show you How To Root Samsung Galaxy S duos S7562..now make sure you have battery charge about 70% and do a complete backup of your important files contacts and messages.make sure you have samsung USB drivers installed on your computer.

So now lets begin

Step 1: We need to Download rooting files and extract to your computer.

Step 2: Enable debugging mode. Go to app drawer>settings>manage application>Development>USB  debugging -check box.

Step 3: Now switch off your phone.and reboot your phone by pressing Volume Down +  Power Button together.press power button again to confirm.you will see android repair logo.Now your phone will be in Downloading mode.

Step 4: Now connect your phone to your computer with USB cable.Then open the extracted folder that you have downloaded and open file "odin.exe"

Step 5: Now you will see ID:COM box will turn yellow if the USB connection is successful.Now click "PDA" button select file "recovery.tar" from the folder.

Step 6: "F.Reset time" and "Auto Reboot" should be checked box.and not any other box are to be checked.Now click start button in the Odin and wait for the installation to take place.your phone will restart automatically.

Step 7: Now you have successfully rooted your phone.you can check by looking ab superuser app in the menu. 

Friday 19 July 2013

How to create and put privacy policy to your blogger website

How to create and put privacy policy to your blogger website.

Hello good people.today i am going to show you how to create and put privacy policy to your blogger website.i will be showing you here how to generate the privacy policy code and then where to place it on the blogger website.so now lets begin.

First we are going to generate the privacy policy code.

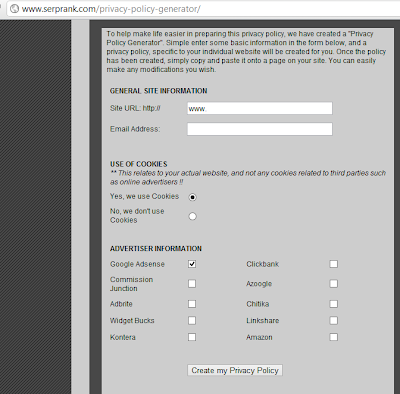
Step 1: To get the privacy policy code we will go to this website. open the link given.
Step 2: Fill the General Site Information.
Step 3: Now click "Create My Privacy Policy".you will get the privacy policy code then copy it.
Step 4: Now we need to paste the code in the blogger website.

Now we are going to place the code in the blogger website.

Step 1: Log in to the blogger website.then go to post and give the title as "privacy policy" and place the code in the body and save it.
Step 2: Now we have the privacy policy in the post,we need to put in in the "attribution".
Step 3: Now open the privacy policy post and copy the URL
Step 4: Now go to "Layout" and then select "attribution".

Step 5: We need to paste the URL here.but we need to put it under HTML code.
Step 6: So to do that use this <a href="PUT THE POST URL HERE"> Privacy Policy</a>
Step 7: Replace PUT THE POST URL HERE with the privacy policy post URL.
Step 8: Now in layout click attribution then click edit paste the   <a href="PUT THE POST URL HERE"> Privacy Policy</a>  here and save it.


Thursday 18 July 2013

How to root HTC explorer

How to root HTC explorer.

Hello good people.today i am going to show how to root HTC explorer.so lets start the rooting process.so before that keep the battery charge more than 70%.and make a backup of all the important files,contacts and messages.so now lets begin the rooting process.

1.  First we are going to install clockworkmod.so we need to download this zip file.
2.  Now go to Settings>Manage application>Development>USB debugging and enable USB debugging
3.  Your phone bootloader must be Unlocked.
4.  Now copy the zip file to your computer and extract in a folder.
5.  Now take your phone and switch it off.now reboot your phone my holding "Volume down + Power button" After entering recovery select Fastboot.
6.  Now connect your phone to computer with USB cable.
7.   Now open the extracted folder and open "RunMe.bat" file and from android menu select first option in"3 android menu".
8.  After the process gets completed clockworkmod will get installed.
9.  Now for the rooting we need superuser file here and place it on the sd card.
10.  Now switch off your phone and hold "volume button + power button" to enter the recovery mode.
11.  In recovery menu select "install zip from SD card" and navigate the superuser zip file you just downloaded and select YES.
12.  Now flashing will take place for few minutes.after the process gets completes restart your phone and look for superuser app.now you have successfully rooted your phoone.

Wednesday 17 July 2013

How to Generate and Add XML sitemap on your blogger website

How to Generate and Add XML sitemap on your blogger website.

Hello good people.today i am going to show you how to generate and add XML sitemap on your blogger website.so now lets begin with it.

1. Go to this website and generate the sitemap.

2. Now after you have generated the sitemap copy the entire code.
3. Now go to blogger dashboard>search preference and select "enable custom robots.txt contents" and click yes.

4. Now paste the code in the below box and save it.
5. Yes now you are done with it.now it will take 24hours to appear in google search engine. 

How to Root Samsung Galaxy Note N7000

How to Root Samsung Galaxy Note N7000

Hello good people.today i am going to show you how to root samsung galaxy note N7000.so first we are going to backup all the files,apps,contacts,messages by using backup app like titanium backup.and we need to maintain minimum of 70% battery.we don`t need any problem while rooting.

Files needed.
1. We need to download Root busybox.zip
2. Now transfer the downloaded file to the phone sd card.
3. Now disconnect the phone from the computer if its connected.
4. Now switch off the phone and reboot the phone by holding  Vol Up + Home + Power together.
5. Now the phone will enter recovery mode.Note-you can navigate by using volume button and select by power button.
6. Now select "apply update from external storage" and navigate the zip file that you have downloaded and saved in sd card,and now select yes.
7. This will start install the zip file to the phone.
8. After few minutes the rooting is completed.
9. Now reboot the phone normally and you will see superuser app installed.that will confirm that rooting was successful.

How to Root Samsung Galaxy Pro

How to Root Samsung Galaxy Pro

Hello good people.today i am going to show you how to root samsung galaxy pro.so we need galaxy pro to be 60 percent charged or above.make a backup of all the files,contacts,messages and apps using any backup app.so now lets begin rooting.

File needed.
1. Download superoneclick root and save it in your computer.
2. Now open the zip file that you downloaded now and extract it to a folder.
3. Now in your phone go to Settings > Application > Development and enable debugging mode.
4. Now connect  the phone to computer.and open the file and select root.
5. Now the rooting will take some time to finish.
6. After the rooting is completed you will need to install busybox app.
7. Now you have completed the rooting,just reboot the phone and you will fine superuser app available .that confirms rooting is successful.

How to Root Samsung Galaxy Ace

How to Root Samsung Galaxy Ace

Hello good people.Today i am going to show how to root samsung Galaxy ace.so before rooting we need to do a full backup.so that we don`t need any data loss.use titanium backup.or try a nandroid backup.

Files needed.
1. Download the zip file here
2. You need to have a good working internet and a data cable.
3. Maintain battery more that 60 percent.
4. Transfer the zip file to sd card of the phone.
5. Now we need to enable debugging mode.Go to Settings > Application > Development > Enable USB Debugging.
6. Now switch off the phone and hold "Volume Up + Power + Home".now your phone will enter to recovery mode.
7.Now go to Install zip from sd card and navigate to the zip file that you have downloaded.
8. Let the file gets installed.after the installation go and click “Wipe Cache” and “Wipe Data/Factory Reset”
9. Now your phone will be done with the rooting.reboot the phone and now you will see superuser app available.that confirms that rooting is successful.

Tuesday 16 July 2013

How to Root Micromax A116 Canvas HD

How to Root Micromax A116 canvas HD.

Files needed!

1. Download flash tools
2. Download recovery img here
3. Download drivers for phone here
4. Download super user package here
5. Download super user bin here

First we need to flash clockworkmod on your phone.

1. install both flash tools and phone drivers on to your computer.
2. click  on the Scatter-loading button on the right side below downloading agent and choose Click on the Scatter-Loading button on right side below downloading agent and choose MT6589_Android_scatter_emmc.txt
3.now un-tick all entries except recovery.and select recovery and click "recovery.img"
4. now remove the battery from the phone.Note-your phone should not be connected to your computer this time.
5. now click DOWNLOAD from sp flash tools and click YES.
6. now connect your phone to the computer with USB and it will flash new clockworkmod recovery to your micromax a116.
7.now wait for the progress to be completed.and your phone must no be installed with clockworkmod recovery.

Now for Rooting micromax a116.

1. download superuser package and superuser bin if you have not downloaded.
2. copy both the file to the sd card.
3. Now we need to enter recovery mode.Reboot to recovery ( press the Volume Up + Volume Down + Power Button. You will see modes, select recovery mode.
4. You can navigate by volume button and select by power button.
5. now go to install zip from sd card and navigate to the sd card and install both the zip file you have downloaded.
6.After flashing both the files,reboot your phone by selecting the option there.
7.Now you can see "superuser su" app installed.that will confirms that rooting is successfully done.

How to Root LG Optimus L5


How to root LG Optimus L5

Hello good people.today i am goin to show you how to Root LG optimus L5 E610/E612/E615/E617.

Files needed!

1. LG USB drivers here
2. Root files here
3. system backup apk here.
4. astro file manager from play store.

Lets start Rooting the device.

1. Maintain full charge,we don`t need any problem in middle.
2. Now install the astro file manager and install the system backup apk file that you just downloaded.
3. Now go to settings>development option>debugging mode.enable it.
4. Now connect your phone to computer in CHARGE ONLY MODE.
5. Now open the system backup apk file you just installed on your phone.
6. Next you have to reboot your phone.Note-you have to keep the "system backup file" open while rebooting.
7. Now when your phone is fully rebooted,Go to your computer and open "root.bat".wait for the process to get completed.Note-your phone must be connected to your computer.
8. After the rooting process is completed you can see a "superuser" application installed on your phone.that will confirm that rooting is done successfully.

Monday 15 July 2013

How to Root samsung galaxy y

Root Samsung galaxy Y S5360.

Hello good people.today i am going to show you how to root samsung galaxy y.

1. Keep battery above 60percent.if you have any trouble then ask me first.
2. You need to have samsung kies installed and a internet connection.
3. Download this file and save it in your samsung galaxy y SD card.
4. Now go to settings>application>development,and check the USB Debugging.
5. Now switch off your phone and Now press VOL UP + Home + Power button together.
6. Now you will be in the Recovery mode.use volume button to navigate up and down.
7. Now go to Install zip from SD card and select the zip file that you just downloaded and copied to sd card.and click yes to install.
8. Now wait for the installation.after that go back and select "wipe data and factory reset"this will wipe all the data from your phone.and now you need to enable "wipe cache partition" in that same menu.
9. now reboot the phone and now your phone must be rooted.you can restore all the data.

Earn money from your Website

Earn money from your website.

Hello good people.did you know you could earn money from your website by placing advertisement.today i am going to show how it is done.

1. You need to have your website and should have alot of traffic.you can check my other blog how to get a lot of traffic to your website if you have less traffic on your website.
2. Create a account in google adsense.fill your personal information and also your website detail.
3. Now you need to wait 24hours for the confirmation email from google . Note-confirmation may take long time in some website.
4. Once your website is verified by google adsense you will be able to place ad on your website.
5. You need to have access to HTML code of your website to paste the adsense ad code in your website.take help from expert if you have no idea about HTML.
6. After the code is placed it will take 24hours to display ad on your website.so sit relaxed.
7. Note-do not click on your own website ad.that would remove ad and may permanently disable adsense account.
8. Go to adsense dashboard and look for the estimate earning.so more the traffic to your website more will be the earning.

Any questions please be free to ask.thank you.

Sunday 14 July 2013

Earn money from youtube

Hello good people here.today i am going to show you how to make some serious money from youtube.
you must be watching watching videos in youtube and those getting millions of view.and making money in no time.so lets begin.

1. Make a youtube account if you dont have one.
2. Now upload videos which you own.that means you need to make some real videos.get a good video camera and upload the videos.
3. share your videos with friends and family.share them on facebook twitter and get lot of views on to your video.
4. After few days when you reach views close to a thousand you will get a email saying to monitize your videos and earn revenue.
5. Now signup for the adsense account and fill your details.
6. now wait for 24hours to show up ads on your youtube videos.now you can check your youtube account for revenue you earn.you will be payed after reaching $100.

How to put facebook like button on your website

Hello good people.Today i am going to show you how to put facebook like button on your website.
This will bring alot of traffic to your website from facebook.you need to first create a facebook fan page for your website.

1. Go to facebook development page here.it should look like this here.
2. now enter the URL of your fan page in the form with "http://".
3. after you have configured all click Get Code.
4.Now you get a HTML code which will look like this.
5. Now copy the Javascript code and go to your blogger website.
6. go to template and first make a backup of the current template.
7. now open the HTML and paste the javascript code under <body> and save it.
8.In some HTML template you can fine only  <body.
9.After saving it refresh your blogger website and now you must fine facebook like button.


Saturday 13 July 2013

How to install Cyanogenmod on any android phone

Installing Cyanogenmod on Android.

Cyanogenmod is the most flexible and stable Custom rom made for the android phone.these rom replaces the stock rom which was installed initially when buying the phone.

1. Download the zip file for your phone from cyanogenmod website here
2. Your phone must be rooted first,and maintain battery about 70 percent.
3. Download rom manager from play store.
4. Install clockworkmod by selecting the phone model.
5. Copy the zip file to the sd card.
6. Go to rom manager and reboot to recovery.
7. Go to backup and restore,make a nandroid backup of current rom.
8. Now go back and wipe cache/reset phone.
9. Now select install zip from sd card and locate the zip file that you have downloaded from the cyanogenmod website.
10. Click YES.and wait for 5min and your phone will restart automatically.your phone now must be installed with cyanogenmod.

How to bring very large amount of traffic to your website

Get traffic to your website.

Now you may be looking at your website and waiting for users to check your website.but that wont bring a lot of people to view your website.i am going to say you how to get more traffic to your website.

1. Best way is to make a fan page in facebook.you can post your new blog in the fan page and bring traffic to your website.people may share the post and bring alot of traffic.

2. Make a twitter account for your website and get a lot of followers.now put the website link on the twitter account.you can be lucky here because your followers may retweet the post and that will bring alot of traffic.

3. Try youtube for large traffic.millions of people stay online in youtube watching videos.make a video about your website and share it in  youtube.give a nice description about your website.

4. Use search engine optimization.this is very good program made by google.this will bring your website intop ranking in google search.

Friday 12 July 2013

Guitar chords full chart

Here are the guitar chords 


Get more traffic to your blog by keeping only the title of the blog

Get more traffic to your blog.

you can swipe your title of the blog and not keeping the name of website,this will improve the chances of getting more views on your blogger website.

So lets get started with it.

1. Go to blogger dashboard and click "Template" then "edit HTML"

2. Find a code which looks like this.
                                            "<title><data:blog.pageTitle/></title>"

3. Now you have to replace this code with the code given below.

                                             <b:if cond='data:blog.pageType == "item"'>
                                                            <title><data:blog.pageName/> |<data:blog.title/></title>
                                                            <b:else/>
                                                             <title><data:blog.pageTitle/></title> </b:if>

4. Now save the HTML and now you re done,you can check the title of the blog has changed to only the blog name.


Thursday 11 July 2013

How to install CyanogenMod on samsung galaxy S2 I9100

Files needed!

1. download the official cyanogen mod from here
2. do not extract the Zip file which you have downloaded.
3. your phone should be rooted first.
4. copy that zip file to the sd card.
5. goto rom manager in your and reboot to recovery.
6. do a nandroid backup before doing anything.
7. now wipe cache/reset phone.
8. goto install zip from sd card and locate it and click YES.
9. wait for the rom to be installed.
10. your phone may restart once or twice and your phone should be how installed with cyanogenmod.

How to install CyanogenMod on LG optimus L3 E400

Files needed!

1. Your phone should be rooted first.you can look in my other blog how to root.
2. Install Rom manager from play store.
3. Download the cyanogenmod file and save it to the SD card.
4. Goto rom manager and click "reboot into recovery".
5. Now your phone will restart and enter to clockworkmod recovery.
6. Goto backup and restore and do a nandroid backup incase you get stuck in middle.
7. Now goto wipe data/reset and click wipe and click ok.
8. Now goto install Zip from Sd card.
9. Locate the zip file in the sd card and click YES.
10. Now wait for 5min and your phone will restart and cyanogen mod should be installed now.
11. Checkout my  Video tutorial

Wednesday 10 July 2013

How To Unbrick LG Optimus L3 E400


Files needed!

1.  Download lg PC suite and USB driver LG PC suite
2.  Download official lg optimus l3 firmware for your country firmware
3.  Download KDZ updater and install it on your computer KDZ updater
4.  Install msxml file found in the KDZ updater folder.
5.  After all this is with you.now you have to turn your phone to emergency mode.to do this just remove the battery and put is back again and then press volume UP + volume DOWN + power button at once.now wait for the vibration.then you will see a emergency mode written on yellow background.
6.Now connect your cell to your computer with USB cable.
7.  After that open KDZ updater and click 3GQCT in type and EMERGENCY in phone mode.and browse the firmware you downloaded and put it in the KDZ file.
8. After that click LAUNCH SOFTWARE UPDATE.
9. Now wait for 10-12min for the software to be updated.
10. Finally you will see a message FINSHED.
11. Your phone will reboot automatically after this.

If you have followed all the step correctly then your software update will be successfull.

How To Root Your LG Optimus L3 E400


Files needed!

1. Download rooting script for your LG optimus l3 E400 Rom spectrum
2. Now you have to put your cell in debugging mode.
  to do this go to Settings>applications>Development and click the USB debugging option is checked.
3. Now open the root spectrum folder that you downloaded.
4. Now open the file "Run.bat"
5. Now click Ok ,then it will take few minutes to root.
6. Your phone will reboot automatically after the rooting is complete.
7. Now check for the application "superuser" in the menu,now your phone is rooted.
8. If you cant find "superuser" then rooting is unsuccessfull.so go through the steps properly.

Tuesday 9 July 2013

Privacy Policy

Privacy Policy for www.noziyeas.blogspot.com 

If you require any more information or have any questions about our privacy policy, please feel free to contact us by email at noziyeas@gmail.com. 

At www.noziyeas.blogspot.com, the privacy of our visitors is of extreme importance to us. This privacy policy document outlines the types of personal information is received and collected by www.noziyeas.blogspot.com and how it is used. 

Log Files
Like many other Web sites, www.noziyeas.blogspot.com makes use of log files. The information inside the log files includes internet protocol ( IP ) addresses, type of browser, Internet Service Provider ( ISP ), date/time stamp, referring/exit pages, and number of clicks to analyze trends, administer the site, track user’s movement around the site, and gather demographic information. IP addresses, and other such information are not linked to any information that is personally identifiable. 

Cookies and Web Beacons 
www.noziyeas.blogspot.com does use cookies to store information about visitors preferences, record user-specific information on which pages the user access or visit, customize Web page content based on visitors browser type or other information that the visitor sends via their browser. 

DoubleClick DART Cookie 
.:: Google, as a third party vendor, uses cookies to serve ads on www.noziyeas.blogspot.com.
.:: Google's use of the DART cookie enables it to serve ads to users based on their visit to www.noziyeas.blogspot.com and other sites on the Internet. 
.:: Users may opt out of the use of the DART cookie by visiting the Google ad and content network privacy policy at the following URL - http://www.google.com/privacy_ads.html 

Some of our advertising partners may use cookies and web beacons on our site. Our advertising partners include ....
Google Adsense


These third-party ad servers or ad networks use technology to the advertisements and links that appear on www.noziyeas.blogspot.com send directly to your browsers. They automatically receive your IP address when this occurs. Other technologies ( such as cookies, JavaScript, or Web Beacons ) may also be used by the third-party ad networks to measure the effectiveness of their advertisements and / or to personalize the advertising content that you see. 

www.noziyeas.blogspot.com has no access to or control over these cookies that are used by third-party advertisers. 

You should consult the respective privacy policies of these third-party ad servers for more detailed information on their practices as well as for instructions about how to opt-out of certain practices. www.noziyeas.blogspot.com's privacy policy does not apply to, and we cannot control the activities of, such other advertisers or web sites. 

If you wish to disable cookies, you may do so through your individual browser options. More detailed information about cookie management with specific web browsers can be found at the browsers' respective websites.